1. Sources Management
1.1. Git - Repositories
eXo Platform is built from several projects stored in different Git repositories.
| platform-private-distribution |
eXo Enterprise Edition |
| chat |
eXo Chat |
| onlyoffice |
eXo Only Office |
| news |
eXo News |
| digital-workplace |
eXo Digital Workplace |
| analytics |
eXo Analytics |
| layout-management |
eXo Layout Management |
| web-conferencing |
eXo Web Conferencing |
| tasks |
eXo Tasks |
| agenda |
eXo Agenda |
| ecms |
eXo Content Management System |
| JCR |
eXo JCR |
| meeds |
Meeds.io Community Edition package |
| app-center |
Meeds.io application center |
| gamification |
Meeds.io mobile push notifications |
| perk-store |
Meeds.io Perk Store |
| kudos |
Meeds.io Kudos |
| wallet |
Meeds.io Wallet |
| gamification |
Meeds.io gamification |
| commons |
Meeds.io Social |
| platform-ui |
Meeds.io UI stylesheets |
| Portal |
Meeds.io Portlet Container and Portal Services |
| Core |
Meeds Core Services : IOC Services, IDM, Security, SSO APIs |
1.2. Git - Settings
1.2.1. GitHub
GitHub is the platform we choose to host our Git repositories. To contribute to eXo projects you have to create a GitHub account.
Please follow the github guides to setup your environment.
1.2.2. Git Configuration
It is recommended to create an SSH private key (with a password) and to use it to access to your Git(Hub) repositories (see Github guides above).
By default you have at least to setup your default identity that will be used for all git instances on the system if you don’t override them locally.
git config --global user.name "John Doe"
git config --global user.email "jdoe@exoplatform.com"
1.3. Git - Workflow
eXo Platform product relies on a set of Git repositories :
-
meeds-io: Meeds-io association product GitHub organization based on Licence LGPL v3 (Open Source and free to use). All members of the association benefits from this product.
-
exoplatform: eXo Platform Git organization having private and public repositories. This organization has the major part of source code of eXo Platform product, Software Factory tools, Tribe addon…
-
exo-docker: eXo Platform Docker Images used mainly by Ops for Software Factory and Product Deployments.
-
exo-addons: eXo Platform Git organization used for non-supported addons.
-
exo-archives: eXo Platform Git archived repositories.
-
exo-puppet: eXo Platform Git repositories for automatic Deployments and its configurations tooling.
1.3.1. CI/CD
The CI/CD is applied on the following branches:
-
stable/*: during Test Campaign of a minor or major release, when the FTs didn’t start to work on new features yet. -
develop-XXX: development branch for each association member (for example,develop-exofor eXo Platform)
1.3.2. Branching model
Branching model are 6 kinds of branch :
-
develop: Develop branch contains the latest delivered and stable development changes. -
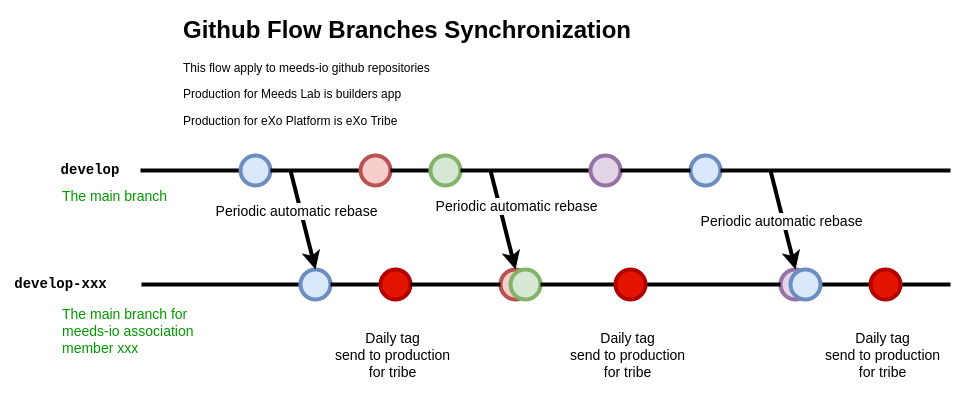
develop-xxx: the develop branch for each Meeds Association’s member. This branch is the branch deployed in production by the CI/CD. For example, every night, Builders application is deployed from branch develop-meeds. eXo Tribe is deployed from branch develop-exo. These branches only exist on meeds-io repositories. -
feature/xxx: Feature branches are dedicated to a single large feature (lots of commits), "xxx" is the feature name. These branches can be created from develop-meeds or develop-exo for meeds repositories, and from develop for exoplatform repositories. -
stable/xxx: Stable branch are used to perform releases and write / accept fix. "xxx" is the stable version name (e.g 1.0.x). -
fix/xxx: Fix branch is dedicated to integrate bugfix on Develop branch. If needed the fix is then cherry pick on stable branch. -
integration/xxx: Integration branches are dedicated branch to automatic integration task (like Crowdin translation). -
poc/xxx: Poc branches are dedicated branch to develop a Prove of Concept (PoC).
1.3.2.1. Develop Branch
For meeds-io repositories, develop branch is the branch containing all completed and properly tested features. For exoplatform repositories, develop branch is the production-ready branch which is, in general case, the CI/CD production branch.
It contains the latest delivered development changes. This is our backbone where all the different fix and new feature are mixed with each other.
For meeds-io repositories, when members complete a feature, they merge it on develop branch from their develop-xxx branch. Then, on a regular basis, a rebase is done to propagate these new changes on other members' develop branch :
1.3.2.2. Feature Branch
Feature branches are dedicated branch to develop a new feature.
On meeds-io repositories, feature branches are created from develop-xxx branch (develop-exo for and eXo Platform features). On exoplatform repositories, feature branches are created from develop branch.
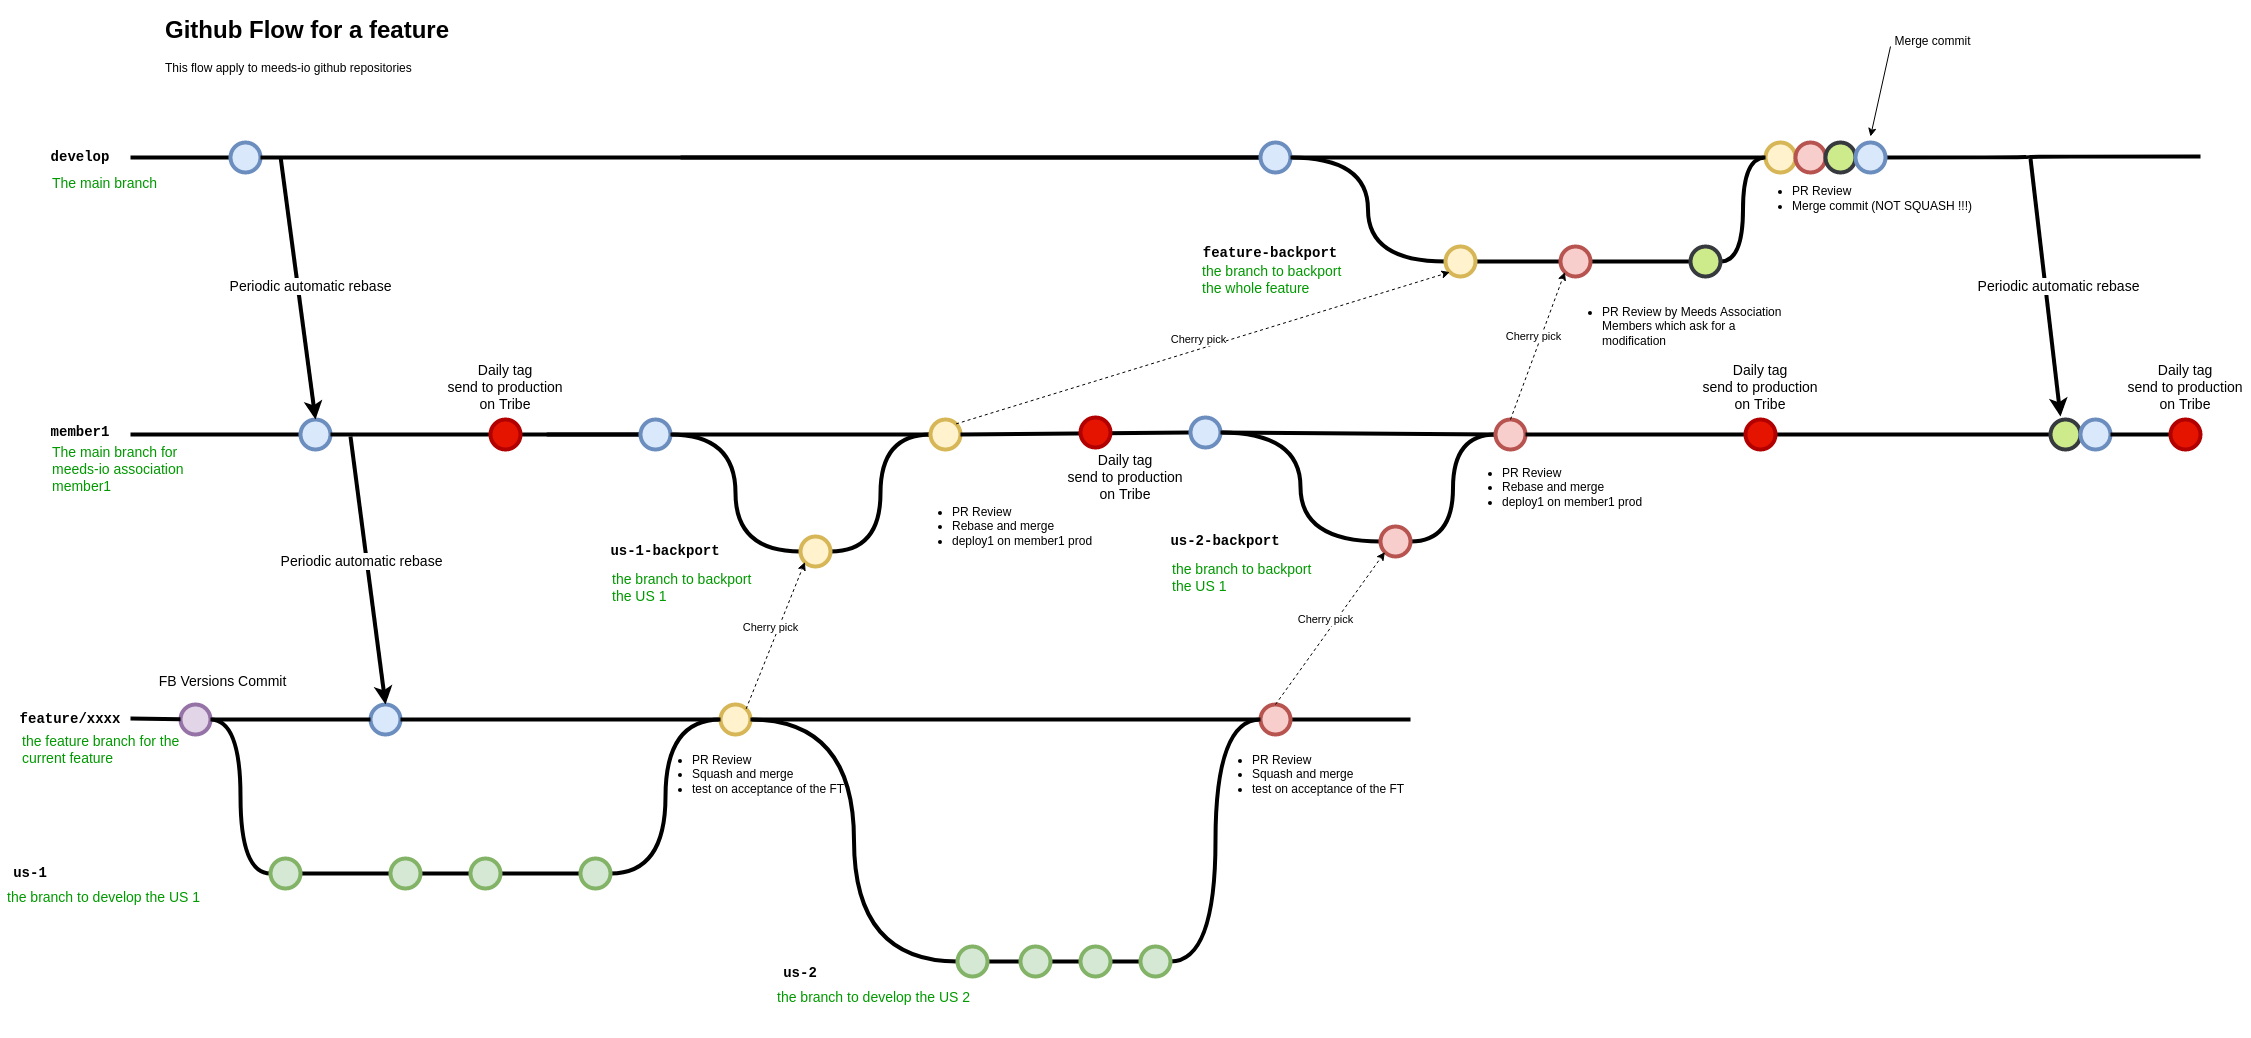
In meeds repositories, when a User Story (US) is completed, it is backported to develop-xxx branch. So that, the nightly deployment will attempt to push it in production for the association member which develops it, without impacting other association members. When the feature is finished, all US composing it are added in a Pull Request on develop branch. The PR is reviewed by other association members, and merged in develop branch when validated.
Important : When this last PR is merged, we should keep all commits in the develop, so, not use squash option to merge !!

In eXo repositories, there is no develop-xxx branch, we only use develop branch.

1.3.2.3. Fix Branch
1.4. Contributions
1.4.1. Workflow
The contribution workflow mainly relies on Github Pull Requests.
1.4.1.1. Creating the PR
Once a contribution is ready to be shared, commit the changes (see Commits messages best practices for Commits best practices) and create a PR. Creating a PR is easy and allows to share, discuss and validate more easily the contribution. To create a PR :
-
create a branch locally with your fix and push it to Github
-
go to Github, and select your branch, to create New pull request
-
select the right base branch (
develop,feature/,stable/…) and check that the PR contains only your commits -
fill the description !
-
click on Create pull request
-
choose one or multiple reviewer(s)
-
add in task the reference to the PR in a comment
-
wait for a review and the build of the PR to commit changes on target branch
1.4.1.2. Reviewing the PR
When a PR is submitted, it has to be reviewed by at least one peer.
Please refer to the chapter Contributions reviews to learn more about review best practices.
During the review iterations, the developer may have to update the contribution. In order to update a PR, just push a new commit in the same branch, no need to create a new branch and a new PR. Creating a new PR for each update prevents from following easily the discussion and the updates history.
Code Review does NOT mean Test, Reviewers are NOT TestersThe role of the reviewers is to review the code changes (code best practices, better/easier solution, …). They do not necessarily have to test (they can if they want/need of course). The author of the PR must not rely on the reviewers to test it, he/she is responsible for that (and the QA people will help during their test campaigns). |
1.4.1.3. Automatic checks on PR
Besides reviews by peer, all PR are submitted to the following automatic checks:
-
compilation - Each time a PR is submitted or updated, the project is compiled. If the compilation fails, the PR is automatically rejected.
-
unit tests - Each time a PR is submitted or updated, the unit tests are executed. If at least one test fails, the PR is automatically rejected.
-
minimum test coverage - Each time a PR is submitted or updated, a check is done on test coverage to make sure it does not decrease (see Test coverage for more details). If the new test coverage is lower than the one set in the Maven configuration, the PR is automatically rejected.
1.4.1.4. Merging the PR
When the PR has been validated by the peer and has passed all the automatic checks, the PR can be merged in the target branch. Before merging the PR in the target branch, make sure the branch of the PR is up to date.
1.4.2. Community Contributions
Anyone with a Github account can contribute to eXo Platform. The only difference for people outside of the eXo Platform organization is they must sign a Contribution License Agreement. The Contributor License Agreement is needed to clarify the terms of usage of contributions by eXo Platform and the entire open source community.
The CLA must be printed, signed, then scanned as a PDF file and sent at cla@exoplatform.com.
1.4.3. Issues references
To keep history about a new feature or a fix, we need to add a reference in the commit message.
1.4.3.1. New Feature
When eXo Platform wants to develop a new feature, we usually have the US described in an eXo Tribe task. If the feature is only about exoplatform repositories, we can only keep the task. But if some meeds-io repositories are impacted, we need to communicate publicly on this new feature and fill a "Feature Request" issue on github : in the repository meeds : choose the tab "Issues" and create a new issue of type "Feature Request". Follow the template to describe your feature request.
**Is your feature request related to a problem? Please describe.**
A clear and concise description of what the problem is. Ex. I'm always frustrated when [...]

**Describe the solution you'd like**
A clear and concise description of what you want to happen.

**Describe alternatives you've considered**
A clear and concise description of any alternative solutions or features you've considered.

**Additional context**
Add any other context or screenshots about the feature request here.
1.4.3.2. Fixes
When eXo Platform wants to fix something, the problem description is usually in an eXo Tribe task. If the fix is only located on exoplatform repositories, we can keep only the task. But if some meeds-io repositories are impacted, we need to communicate publicly on this fix and fill a "Bug Report" issue on github : in the repository meeds : choose the tab "Issues" and create a new issue of type "Bug Report". Follow the template to describe the problem and how you fix it.
**Steps to reproduce**

Steps to reproduce the behavior:
1. Go to '...'
2. Click on '....'
3. Scroll down to '....'
4. See error

If applicable, add screenshots to help explain your problem.

**(optional) Affected version**

Indicate the version where the bug is observed.

**Current behaviour**

Describe the bug with a clear and concise description of what the problem is.

**Expected behavior**

A clear and concise description of what you expected to happen.

**(optional) Affected environments**
Please complete the following information:
 - OS: [e.g. iOS]
 - Browser [e.g. chrome, safari]
 - Version [e.g. 22]
 - Device: [e.g. iPhone6]
1.4.4. Commits messages best practices
It is often important to browse the source code history to understand when and why a change has been done. Good commits message are therefore crucial to help developers in maintaining a code base. In addition, to facilitate the release note creation, we use "Conventional Commits". In order to improve the quality of the commit messages, the following rules must be respected:
-
use
git commitinstead of
git commit -m “My commit message”when committing a change, in order to write a more detailed commit message and use the commit template
-
the commit message must start with a keyword 'fix:' or 'feature:' according to the type of the commit, then a short subject (max 100 characters). It must describe briefly what the commit does. The line must end with the github issue reference (only on a meeds-io repositories) AND the task reference. For example :
fix: Allow to update kudos message in activity stream - EXO-40308 - meeds-io/meeds#1234
-
the commit subject must not be a copy/paste of the Task issue summary. As said previously, it must describe what the commit does, as if the sentence would start with “If applied, this commit would …”.
-
after the subject, one blank line must be added before starting the body
-
the body describes in detail what the commit does and must answer 2 questions :
-
why is this change needed ?
-
how does this change address the issue.
-
It should give as much information as possible to make it easy for another developer who does not know deeply the context to understand the commit. Therefore the body is never too long.
-
after the body, a list of links to relevant resources can be added (optional). It must be separated from the body by one blank line.
Here is an example of commit message following these rules:
fix: Enhance extension registry to trigger event when extensions updated - EXO-37899 - meeds-io/meeds#1234

When updating extensionRegistry asynchronously from different modules, the other modules should be triggered for this update to allow retrieving newly registered extensions. This way, the extension points in all portlets will can be aware, when listening to adequate event, of any change in extensionRegistry.
Of course, all commit messages do not need to be that long, but it must contain all relevant information to understand what and why the changes have been done.
In order to help developers, a template is available (How to apply it ).
Template
# fix/feature: (If applied, this commit would...) <subject> - EXO-<task-id> - meeds-io/meeds#<github-issue>
# |<----  Using a Maximum Of 100 Characters  ---->|

# Why is this change needed?
# Prior to this change, ...
# How does it address the issue?
# This change ...
# |<----   Try To Limit Each Line to a Maximum Of 72 Characters   ---->|

# Provide links or keys to any relevant tickets, articles or other resources

# --------------------
# Remember to
#    Capitalize the subject line
#    Use the imperative mood in the subject line
#    Do not end the subject line with a period
#    Separate subject from body with a blank line
#    Use the body to explain what and why vs. how
#    Can use multiple lines with "-" for bullet points in body
# --------------------
1.4.5. Pull Requests best practices
As much as good commits messages are important for code base maintainers, good PR descriptions are important for reviewers. They help to understand what the developer has done and why. The PR title must start with the keyword fix or feature, then describe briefly what the PR does, then reference the task id and the github issue if needed. For example :
fix: Allow to update kudos message in activity stream - EXO-40308 - meeds-io/meeds#1234
The PR description must at least provide the information given in the commit message body : why is this change needed and how does this change address the issue (Tip: using the first line of the commit message as the PR title and the commit message body as the PR description is a good start for the PR description).
It can also give the following information when relevant:
-
Alternative solutions tried and why they failed
-
Any question, remark or doubt that the developer has
-
Tested environments (tomcat/jboss, databases, ldap, browsers, addons, …)
-
Links to resources which can help to understand the contribution
The PR does not need to describe the issue (functional impacts, reproduction steps, …) since it is already done in the related Task issue.
When you create a PR on meeds repositories, a PR template is available.
1.4.6. Contributions reviews
1.4.6.1. How to do a review ?
The reviewers must use the review feature of Github to do the review. On the first comment, the button “Start review” must be used. Then, once the review is done, the developer must submit the review by clicking on the button “Review changes”, then select the right option:
-
Comment: the review contains only remarks or questions which ask for clarifications but do not necessarily ask for changes -
Approve: the PR is approved -
Request changes: the review contains at least a comment asking for a change in the PR
If the option Approve is selected, the PR is validated, and the Task issue status must be changed to Merge . If the option Comment or Request changes is selected, the PR is considered as not validated.
1.4.6.2. What should I care when reviewing a Pull Request ?
When reviewing a Pull Request, the following things must be checked:
-
Title and commit message : does it respect guideline format (developer.exoplatform.org/#id-commits-messages-best-practices) ?
-
Correctness of the fix/feature
-
Coding best practices
-
Does the code is the simpliest possible ?
-
Should it imply a refactoring to make something simplier ?
-
Code Format
-
If there are new files, check headers
-
If there is a new library or dependency? Was it validated by architects ? What about the library’s license ?
-
If there is a new visual component? Was it validated by Designers Guild ?
-
Check Performance : check loops, sql queries … ask if the loop or the query can have a larger number of elements
-
Learning
-
Unit Tests
-
Security
-
Troubleshooting
-
Upgrades
-
API breaking
-
Documentation
| This list does not only apply to reviewers, but also to contributors! |
2. Coding best practices
2.1. Guidelines
The developer and reviewer of a Pull Request must check the compliance with following guidelines documents:
Beyond those documents and guidelines, the reviewer must check the PR follows the best practices generally admitted in software development. If a practice is not described in the eXo Coding Best Practices document and is used in the PR, it is a good opportunity to discuss about it and add it if necessary in the document.
2.2. Unit Tests
Unit Tests are essential to minimize regressions. The reviewer must check that unit tests are implemented to cover the related bug or the feature, especially:
-
Are the test titles adequately descriptive?
-
Are the key scenarios captured?
-
Are there enough edge cases covered for comfort?
-
Are the tests written with good assertions?
-
If a test fails, would it be easy to track down the error?
-
Are the tests independent from each others (especially if they manage data)?
The reviewer must also ensure that the unit tests coverage minimum ratio defined in Maven configuration is not decreased and advise to increase it if the test coverage has been improved.
2.3. Security
The reviewer must check that the contribution does not introduce security issues, especially in the following areas:
-
Data/Input Validation of data from all untrusted sources
-
All input data must be validated before being used and/or stored in the system (UI forms, REST APIs inputs, …).
-
Authentication
-
Session Management
-
Authorization All the resources of the system (web pages, documents, REST APIs, …) must only be accessible by the authorized population.
-
Cryptography (Data at rest and in transit) Sensitive information must not be transmitted or persisted in clear text. Also, secure method must be used for cryptography (for example do not use MD5 to encode users’ passwords).
-
Error Handling / Information Leakage Sensitive information should not end up in error messages (logs, UI, …). For example do not include passwords or security tokens in logs.
-
Logging / Auditing Some operations require logging/auditing to allow to understand what happened during a security breach or detect security issues as they happen.
2.4. Performance
The reviewer must try to detect if the fix/feature could have significant bad impacts on the performance of the application. Performances issues can be expensive to find and fix, so it is important to raise any concern on this topic at this stage. Here are some examples of performance issues causes: too many database requests, slow database queries, missing index in the database, too many HTTP requests, …
2.4.1. Front-End Performances
In Front-End development, it’s important to consider the best solutions that reduce Memory & CPU consumption in Browser. In fact, a Web page executes only one single thread for all Vue apps, so it’s important to avoid adding a lot of stuff to do when mounting a Vue application (Read more about JS lifecycle). In fact, when adding heavy computing statements in the page loading phase, it will pause mounting all other Vue applications until the computing is finished, because of the single-threaded execution architecture of Web pages. Consequently, having one Vue app that isn’t sufficiently performant in a web page, especially for a TopBar application (that is present on all pages), will degrade the rendering performances of the whole page.
Knowing that the Vue applications rendering has to be made in an asynchronous way without impacting other applications present on the page. For example, when having information to retrieve from Server-End using REST API calls, a fetch call will be used. To ensure to have a good UX, a loading effect in the application itself has to be rendered the first time the Vue application is mounted, until all needed information is retrieved.
But, using the fetch API to retrieve information asynchronously from Server-End has a big drawback. In fact, a Browser allows limited concurrent HTTP requests for each domain (Domain Sharding). In a web page, that holds a lot of Vue applications, each one will retrieve information from Server-End using different REST endpoints. This can consequently lead to a very bad UX with a considerable idle time for HTTP requests. Fortunately, the Web Standards has evolved to take into consideration this complexity of new Web Applications especially by introducing the HTTP/2 protocol (Read more about benifits). To benefit from it, and to allow to increase the parallel concurrent requests to send to Server-End, we will have to preload and prefetch mandatory information that renders the Web Page (Read more).
The retrieved HTML DOM of eXo Platform contains references to the needed CSS files (computed from the list of Portlets being part of the displayed page). The fact that we have CSS links, in the retrieved DOM, will help the browser to determine which files to retrieve using HTTP/2 in an early stage of the Web Page rendering phase. But the Javascript files use a different mechanism based on RequireJS, which will retrieve JS files at the end of Web Page processing. This will lead to sending multiple HTTP requests that will not be optimized using HTTP/2. Thus, the JS and CSS files are preloaded to ensure retrieving those files once at the same time, even when having tens of them. Consequently, all JS files have to use AMD mechanism to be imported inside a page and any new module has to be imported as a dependency of a Portlet asset to ensure not losing time in the Web Page rendering phase. So, there are several bad practices to avoid such as, adding a link element inside a Vue application, or even worse when using requirejs in the render phase on a module that is not a dependency of a displayed Portlet.
The preload and prefetch mechanisms can be used for other types of HTTP requests. In fact, each Vue application needs assets to be fully displayed. In the general case, we will need:
-
A CSS file HTTP request for application stylesheet: handled by Portal API to be preloaded, no specific modifications to make while developing a Vue application
-
A JS file HTTP request to execute Vue application rendering: handled by Portal API to be preloaded, no specific modifications to make while developing a Vue application
-
An I18N JSON file HTTP request: handled by Portal API to be preloaded, no specific modifications to make while developing a Vue application. This type of asset is handled by a different caching mechanism (sessionStorage) to improve the number of concurrent requests sent to the server (see details)
-
A set of HTTP requests to retrieve user settings and/or initial data to display
A Vue application can need one or several HTTP requests to retrieve data from Server-End. It’s important to determine the priority of those requests and in which Web-Page rendering lifecycle, the request has to be sent. In fact, for the main application (The application that the user needs to retrieve its information, for example, the Stream application on /stream page), the requests have to have a higher priority comparing to permanent page applications (TopBar applications). In order to increase the priority of an HTTP request, a <link rel="preload" or <link rel="prefetch" can be used to increase the priority. Even more, you can add a HTTP Header that will allow retrieving the HTTP request at the same time as JS & CSS files (highest priority just after Document DOM downloading). BUT, the preloaded resources shouldn’t be slow queries, else the Web-Page rendering can be blocked for a while, and consequently, the Web-Page performances will degrade. As an example, the Stream page preloads the list of Activity Identifiers without content to let the Stream application load each activity apart. In order to improve activity loading, HTTP caching Headers have been used to efficiently cache activity content retrieving (Using eTag).
Sometimes, when not having a lot of interactions with the user on UI, (like for Wallet & Perkstore widgets), it’s more relevant to compute the HTML to display in Server-End using a simple JSP file without having to mount a Vue application for it and to retrieve its information using additional REST calls. Using Vue applications is relevant only when :
-
the computed information to display is slow: in this case, using a REST call to asynchronously retrieve information from Server-End will allow detaching heavy computing from the critical path of Web-Page DOM retrieving
-
there are complex UI components and user interactions in application DOM
In conclusion, to ensure having good Front-End performances when developing a Vue application, we have multiple techniques that can be applied, but there is no exact coding pattern that we can follow. Each application has its specificities and performances requirement has to be considered in the conception phase, else you can lose time to refactor code. In order to help developers continuously measure developed/maintained applications performances, tooling has been added to display application performances in the Browser console when the server is started in Dev Mode. To enable this, use:
-
Vue.createAppto create a new Vue application instead ofnew Vue -
use statement
this.$root.$applicationLoaded()when all Data is fetched and the UI has been displayed to the End-user.
2.4.2. REST API Performances
The REST API calls count has increased over eXo Platform versions. This was a major evolution of eXo Platform product architecture introduced in version 6 which will reduce the classic Server-End stateful DOM rendering (that was made using JSP, Servlet, Portlet, JSF, Spring MVC…). As an advantage of this, the Rendering phase is decentralized and is deported on the Client-Side. Consequently, the Server will hold less information in its memory (Stateful UI Tree) and make less computing related to page rendering. As a significant drawback of this new architecture, making more parallel computing (parallel REST calls for each page) makes the multi-threading aspect more important to consider. In fact, a REST call has to be performant and must not hold any potential thread-blocking statement. In addition, the HTTP cache headers have to be considered for almost all REST calls. A REST call returns objects of type:
-
CSS/JS
-
Image
-
JSON representing a stored data
For CSS/JS and Images, it’s important to consider using a long-term cache strategy. By doing this, the Browser will always retrieve the resource from the local cache (Disk or Memory cache) and will not fetch the resource from Server-End again. If the resource can be dynamic, such as illustration on news or Application Center thumbnail, you can add a suffix to the URL that references the lastModifiedDate property of the image (See example)
For the JSON objects retrieved using REST API, you can consider using an ETag to cache objects in browser and to verify that it hasn’t been modified since last retrieval. This strategy is very relevant when retrieving information that is not frequently changed, such as an activity that once written, it will not change most of the time. By using this strategy, you will avoid to download the Object content from Server-end which will save Bandwidth consumption (consequently save time) and even save computing time in Server-End for DTO to JSON transformation (See example).
2.5. Maintainability
The maintainability measure how easy it is to make changes in a code base (fixing bugs, adding new features, replacing a faulty or obsolete component, …). This means:
-
Tests are implemented to ensure a good test coverage and help understand how code should behave
-
Classes and methods have a clear and single responsibility
-
Classes, methods and variables names are self-descriptive and/or well documented
-
Classes and methods are short
-
Cyclomatic complexity of a method should be low
-
Components are loosely coupled
-
Code duplication should be avoided
-
Code must respect formatting rules
More generally, if it was hard for the reviewer to understand, the code should probably be reworked to make it easy to understand since it means it will be hard to understand for next developers in the future.
2.6. Troubleshooting
When problems occur in production, it is generally not possible to debug or to update easily the code to find the cause. Therefore, the developer must try to anticipate the potential issues and provide the information and/or tools to help finding the error cause and fixing it. The reviewer must evaluate if the contribution contains the right elements to help this troubleshooting. Here are some examples of question to answer:
-
Is there enough logs ?
-
Do the logs have the appropriate level ?
-
If relevant, in case of problem, is there any tool (JMX bean, …) to gather more information or to recover ?
2.7. Upgrades
Any contribution must be considered to be installed on an existing environment. In such a case it must be ensured that the upgrade is done as transparently as possible:
If data are impacted, an upgrade plugin must be developed
If any configuration change is required, the documentation and the upgrade notes must be updated
2.8. API breaking
API must be stable and can be broken only in major releases. Contributions targeted to minor or maintenance versions must not break the public API. Public API includes:
-
Java API
-
REST API
-
Javascript API
-
Vue components
-
Configuration
3. IDE Settings to work on eXo Platform projects
3.1. Eclipse - Settings
-
Eclipse settings are available in /resources/ide/eclipse.
-
Eclipse Templates Settings are available in exo-Java-CodeStyle-CodeTemplates.xml
-
Eclipse Formatter Settings are available in exo-Java-CodeStyle-Formatter.xml
-
Eclipse Organize Imports Settings are available in exo-Java-CodeStyle-OrganizeImports.importorder
3.2. IntelliJ - Settings
Intellij IDEA users must install the plugin Eclipse Code Formatter and import Eclipse settings files from /resources/ide/eclipse.
-
Create a specific profile (ex: "eXo")
-
Use the file exo-Java-CodeStyle-Formatter.xml for "Eclipse Java Formatter config file"
-
Use the file exo-Java-CodeStyle-OrganizeImports.importorder for "Optimize Imports from file"
4. Build Management
4.1. Maven - Setup guide
4.1.1. Prerequisites
To build eXo projects you need to install a Java JDK 11 and Apache Maven 3.6+.
4.1.2. Configure Apache Maven
Using our template create a file settings.xml in your home directory under a directory called .m2 (if you already launched maven this directory must already exist and it should contain a subdirectory repository where Maven stores all artifacts it processes).
In the ~/.m2/settings.xml configuration file you have to fill your credentials to access to protected binaries or to publish artifacts on repository.exoplatform.org. For a better security, you can encrypt passwords in your settings file, however you must first configure a master password. For more information on both server passwords and the master password, see the Guide to password encryption and the dedicated chapter in the Maven Reference Guide.
When your setup is done you can activate the following profiles :
-
-Pexo-release: Automatically activated while releasing projects. This profile is also activated on our CI server. Your GPG key must be configured. -
-Pexo-private: To access to private binaries on repository.exoplatform.org (eXo employees only). -
-Pexo-staging: To access to staging binaries (releases in validation) on repository.exoplatform.org (eXo employees only). TAKE CARE TO ACTIVATE IT ONLY IF REQUIRED. These repositories are delivering binaries considered by maven as released but allowed to be replaced. Maven never updates released binaries thus you have to cleanup your local repository to grab an updated version.
4.2. Maven - Checks
When building a project, beyond compilation and packaging, some checks are performed.
4.2.1. Unit tests
When a project is built, the unit tests are automatically executed. If one of the unit tests fails, the project build fails.
4.2.2. Test coverage
When a project is built on our Continuous Integration server, a check is done on the test coverage ratio to make sure it does not decrease.
The test coverage ratio is set in each Maven module in the property exo.test.coverage.ratio. For example
<properties>
  <exo.test.coverage.ratio>0.72</exo.test.coverage.ratio>
</properties>
The value is set between 0.0 (0%) and 1.0 (100%). If the new test coverage is lower than the one set in the Maven configuration, the PR is automatically rejected. The rules to change this test coverage ratio are:
-
it can NEVER be decreased
-
when a developer increases the test coverage, he CAN (but this is highly recommended) increase the ratio.
-
ratio must always be defined with a 2 digits precision (for example 0.64, not 0.6)
4.2.2.1. How to run this check locally
The test coverage check is triggered when the coverage Maven profile is activated.
Therefore, in order to run this check locally, you must activate this profile:
mvn clean install -PcoverageIn case the check passes succesfully, you will see this kind of message:
[INFO] --- jacoco-maven-plugin:0.7.6.201602180812:check (check-coverage) @ platform-component-organization ---
[INFO] Analyzed bundle 'eXo PLF:: Platform - Organization Model Integration' with 36 classes
[INFO] All coverage checks have been met.
In case the check fails, you will see this kind of message:
[INFO] --- jacoco-maven-plugin:0.7.6.201602180812:check (check-coverage) @ platform-component-organization ---
[INFO] Analyzed bundle 'eXo PLF:: Platform - Organization Model Integration' with 36 classes
[WARNING] Rule violated for bundle eXo PLF:: Platform - Organization Model Integration: instructions covered ratio is 0.34, but expected minimum is 0.35
[INFO] ------------------------------------------------------------------------
[INFO] BUILD FAILURE
[INFO] ------------------------------------------------------------------------
4.2.2.2. How to check if the ratio can be increased in a module
According to the rules about the minimum test coverage ratio update, if a contributor increases the test coverage ratio, he/she can update the minimum ratio.
But Maven does not give the actual value in its standard output (console).
Instead, this value is available in the jacoco reports, in target/site/test-coverage-ut/index.html.
This report gives the test coverage on each package and the total test coverage of the Maven module.
This last value is the one checked during the test coverage check.
If this value is higher than the one set in the prooperty exo.test.coverage.ratio, it can be updated in the pom.xml.
5. Development
5.1. Test
eXo Platform is delivered as a zip bundle, built on every commit, and available in our maven repository and in our acceptance platform.
If you want to test the zip bundle with one of the supported databases, you can find more information in eXo Tribe site.
5.1.1. Databases
eXo Platform uses by default an HSQLDB database. eXo Platform supports several RDBMS databases, each of them in multiple versions.
First, setup eXo to connect to your database following the eXo documentation. Then start the database.
5.1.1.1. MySQL
You should use a docker container from Docker hub.
For example this command starts a MySQL database server exposed on the default port (3306) and creates a database plf :
docker run -d --name mysql-5.7.22 -p 3306:3306 -e MYSQL_ROOT_PASSWORD=plf -e MYSQL_DATABASE=plf mysql:5.7.22You can connect from your eXo instance with the user root and the password plf.
Please refer to the Docker hub page for full details and configuration options.
5.1.1.2. PostgreSQL
There is no specific Docker image for PostgreSQL for eXo, you should use the official image from Docker hub.
For example this command starts a PostgreSQL 9.6.6 database server exposed on the default port (5432) and creates a database plf :
docker run -d --name postgres-9.6.6 -p 5432:5432 -e POSTGRES_PASSWORD=plf -e POSTGRES_DB=plf postgres:9.6.6You can connect from your eXo instance with the user postgres and the password plf.
Please refer to the Docker hub page for full details and configuration options.
5.2. Translations
All the translations are managed in Crowdin. For each PLF version, a Crowdin project is created and linked. A synchronization between the eXo source code and Crowdin is performed once per day.
5.2.1. How to add / delete a new localization file?
In root path of each project (ecms, wallet, agenda…), you 'll find a translation.properties file where
we reference the MASTER localization file for each localization file. (in general we reference the _en.properties
or _en.xml in translation.properties to make sure that english language is considered as MASTER localization
language for Crowdin)
Each line in translation.properties must be formatted as follows:
where
-
crowdin-path is the path of the localization file in Crowdin relative to the root of the Crowdin project
-
source-path is the path of the english (en) localization file in the project sources, relative to the value of the property "baseDir"
For example:
baseDir=add-ons/agenda/
Agenda.properties=agenda-webapps/src/main/resources/locale/portlet/Agenda_en.properties
So if you developed a new application that references a new localization file, you will have to add its reference in root
file translation.properties to make sure that it’s translated by Crowdin contributors, else it will be ignored.
5.2.2. How to update an existing translation string?
Updating a string must be done in Crowdin directly (if it is done in the source code, it will be reset by the next synchronization). Once validated the translated string will be pushed in the sources during the next synchronization.
5.2.3. How to add a new translation string in an existing localization file?
In order to add a new string, simply add it in the master localization file (the file that you added in translation.properties).
The master localization file is the file without a language suffix if it exists, for example resources.properties.
Otherwise it is the english version, for example resources_en.properties.
It will automatically be added in Crowdin during the next synchronization.
You can add the string in others localization files, for testing purpose, but it will be reset during the next synchronization.
5.2.4. How to delete a translation string?
Deleting a string must be done in the sources by simply removing the string in all the localization files containing this string. The string will be automatically deleted in Crowdin during the next synchronization.